
JavaScript, unlike HTML, is case sensitive. When entering JavaScript commands, be careful not to enter characters in the incorrect case, or errors will occur.
In at the Deep End
Let's get right to it and add a JavaScript command to the simple web page we developed in Lesson 2, "Writing Web Pages in HTML."
Open your favorite text editor and load up seville.html (Listing 2.2 from Lesson 2). We're going to add the following code to the page, immediately after the </p> (the closing paragraph tag) on line 24:
<script language="JavaScript" type="text/javascript">
document.writeln("This line was written using JavaScript!");
</script>
Caution
| JavaScript, unlike HTML, is case sensitive. When entering JavaScript commands, be careful not to enter characters in the incorrect case, or errors will occur. |
The whole of the source code with the extra lines added is shown in Listing 4.1. Make sure that you have added the code correctly; then save the file as testpage3.html and load it into your favorite browser.
Listing 4.1. Adding JavaScript to an HTML Page
<!DOCTYPE HTML PUBLIC "-//W3C//DTD HTML 4.01 Transitional//EN" "http://www.w3.org/TR/html4 |
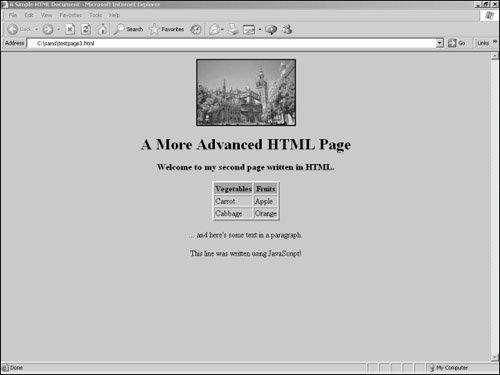
If all has gone well, the page should now be like that shown in Figure 4.1. You should now be able to see an extra line of text toward the bottom of the page saying "This line was written using JavaScript!"
Figure 4.1. HTML document including one line written by JavaScript.
Let's look at our JavaScript code. The first item is the <script> tag, and here we have included the definition
Language="JavaScript"
which tells the browser that the statements contained within this script element should be interpreted as JavaScript.
Also in this tag appears the attribute
type="text/javascript"
This declares that the script enclosed in the element is written in JavaScript.
Tip
 | There are other possible languages in which such scripts could be written; each has its own type declaration such as type="text/vbscript" or type="text/xml" |
The script is ended on the next to the last line with the familiar </script> tag.
Now for the meat in the sandwich:
document.writeln("This line was written using JavaScript!")
JavaScript (in common with many other programming languages) uses the concept of objects. The word document in this line of code refers to the object on which we want our JavaScript command to operate. In this case, we are dealing with the document object, which is the entire HTML document (including any embedded JavaScript code) that we are displaying in the browser. We'll have a further look at objects later in the lesson.
The term writeln describes the operation we want JavaScript to perform on the document object. We say it is a method of the document object, in this case one that writes a line of text into the document.
Note
 | In addition to methods, objects also possess properties. Such properties tell you something about the object, as opposed to the object's methods, which perform actions upon it. |
The string within the parentheses we refer to as the argument that we pass to the writeln method. In this case it tells the method what to write to the document object.
Including JavaScript in HTML Pages
We can include as many <script>...</script> tags in our page as we need. However, we must pay some attention to where in the document they are placed.
JavaScript commands are executed in the order in which they appear in the page. Note from Listing 4.1 that we entered our JavaScript code at exactly the place in the document where we want the new text to appear.
JavaScript can also be added to the head section of the HTML page. This is a popular place to keep JavaScript functions, which we'll describe shortly.
Event Handlers
Often you want your JavaScript code to be executed because something specific has occurred. In an HTML form, for instance, you may decide to have JavaScript check the validity of the data entered by the user at the moment when the form is submitted. On another occasion, you may want to alert your user by opening a warning dialog whenever a particular button is clicked.
To achieve these effects you use special interfaces provided by the browser and known as event handlers. Event handlers allow you to call JavaScript methods automatically when certain types of events occur. Consider the following code:
<form>
<input type="button" value="Click Here" onClick="alert('Thanks for clicking!')">
</form>
Here we capture the action of the user clicking the button, using the onClick event handler. When the user's click is detected, the script carries out the instructions listed in the onClick attribute of the input tag:
onClick="alert('Thanks for clicking!')"
This line calls the JavaScript alert method, which pops up a dialog box displaying a message and an OK button. The message to be displayed in the alert dialog is contained in the string passed to the alert method as an argument.
Let's add this code to our HTML document, as shown in Listing 4.2. Save the page as testpage4.html after you've made the changes and load it into the browser.
Listing 4.2. Calling alert() from the onClick Event Handler
<!DOCTYPE HTML PUBLIC "-//W3C//DTD HTML 4.01 Transitional//EN" "http://www.w3.org/TR/html4 |
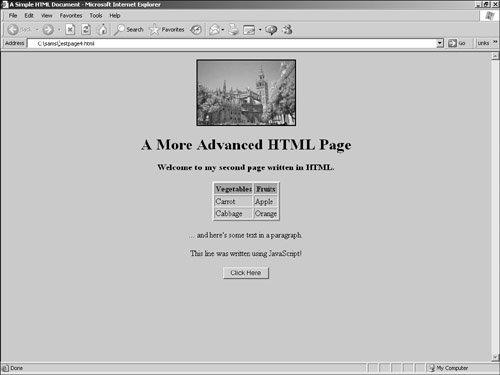
Our HTML page should now show our new button, as in Figure 4.2.
Figure 4.2. The new Click Here button in our web page.
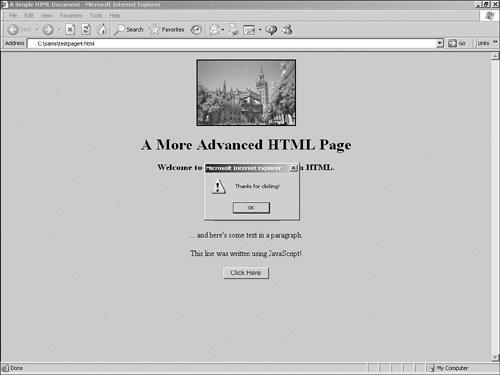
Go ahead and click on the button. If everything goes according to plan, an alert dialog pops open as shown in Figure 4.3. You can click OK to clear the dialog.
Figure 4.3. The dialog that appears after you click on the new button.
Creating Functions
Often you will need to combine various JavaScript methods and objects, perhaps using many lines of code. JavaScript allows you to compose such blocks of instructions and name them, making your code easier to write, understand, and maintain.
For example, let's use another event handler, but this time we'll use it to call a function rather than to directly call a JavaScript method.
Here's the code for our function, which we'll place in the head section of our HTML document:
<script language="JavaScript">
function showAlert()
{
alert("A Picture of Seville")
}
</script>
Note
| Note that a function definition always starts with the word function followed by the function's name. The statements within a function are contained within curly braces {}. |
Within the usual <script> tags, we have now defined a function called showAlert, which carries out the commands contained within the curly braces. In this case, there is only one command, a call to the previously encountered alert method.
We want this alert dialog to appear when the user's mouse passes over the photograph in our web page. We are therefore going to add an attribute to the <img> tag that contains the image, as follows:
<img src="cathedral.jpg" border="2" onMouseOver="showAlert()" alt="Cathedral" />
This line uses the onMouseOver event handler to detect when the cursor enters the area occupied by the photograph. When this happens, our new function showAlert is called.
Listing 4.3 shows the revised code.
Listing 4.3. Using the onMouseOver Event Handler
<!DOCTYPE HTML PUBLIC "-//W3C//DTD HTML 4.01 Transitional//EN" |
With this HTML document loaded into your browser, roll your mouse over the photograph. An alert box should appear with the message "A Picture of Seville".
Passing Arguments to Functions
Of course, we could easily call our function from a wide variety of event handlers within our page and have it pop open an alert dialog. Unfortunately, the alert would always contain the message "A Picture of Seville", which is not very useful!
Wouldn't it be good if we could tell the function what message to display so that we could have different alert messages for different circumstances? We can achieve this by passing the message to our function as an argument:
<script language="JavaScript" type="text/javascript">
function showAlert(message)
{
alert(message)
}
</script>
The function now "expects" to find the text for the message defined passed as an argument within the call. Rewrite the onMouseOver event handler for the image to provide this:
<img src="cathedral.jpg" border="2" onMouseOver="showAlert('A Picture of Seville')" alt="cathedral" />
We'll also rewrite the button's onClick event handler to use this function but with a different message:
<input type="button" value="Click Here" onClick="showAlert('Thanks for clicking!')" />
Listing 4.4 shows the revised code.
Listing 4.4. Calling JavaScript Functions from Event Handlers
<html> |
Other Event Handlers
So far you have seen examples of the onClick and onMouseOver event handlers. Many others are available for use; Table 4.1 lists a selection of the most popular event handlers.
Event Handler | Comments |
|---|---|
onChange | Occurs when the value in an input field changes |
onClick | Occurs when a user clicks the mouse on the element in question |
onLoad | Occurs when the page has finished loading |
onMouseOver | Occurs when the mouse pointer enters the screen area occupied by the element in question ... |
onMouseOut | ... and when it leaves |
onSubmit | Occurs at the point a form is submitted |
![[View full size image]](04fig01_alt.jpg)
![[View full size image]](04fig02_alt.jpg)
![[View full size image]](04fig03_alt.jpg)