
Rico is the Spanish word for rich, which seems appropriate for a toolkit designed for building rich user interfaces!
Introducing Rico
In Lesson 19, "The prototype.js Toolkit," we looked at prototype.js, a powerful and useful JavaScript library that simplifies many of the programming tasks facing the Ajax developer.
In this lesson we'll take a look at using Rico, a sophisticated Ajax framework employing the prototype.js library.
Rico is an open source library that extends the capabilities of prototype.js to provide a rich set of interface development tools. In addition to the Ajax development techniques discussed so far, Rico offers a whole range of tools such as drag-and-drop, cinematic effects, and more.
Tip
| Rico is the Spanish word for rich, which seems appropriate for a toolkit designed for building rich user interfaces! |
Using Rico in Your Applications
To start using Rico to build applications with rich user interfaces, you need to include both Rico and prototype.js libraries in the <head>...</head> section of your web pages.
<script src="scripts/prototype.js"></script>
<script src="scripts/rico.js"></script>
Rico's AjaxEngine
The inclusion of rico.js causes an instance called ajaxEngine of an AjaxEngine object to be created automatically ready for you to use. The AjaxEngine is Rico's mechanism for adding Ajax capabilities to your web pages.
The AjaxEngine requires a three-step process to update page elements via Ajax:
1. | Register the request handler. Registering the request handler associates a unique name with a particular URL to be called via Ajax. |
2. | Register the response handler. Rico can deal with the return of both HTML data and JavaScript code within the XML returned from the server. In the former case, the response handler identifies a page element that is to be updated using the returned data; in the latter case, a JavaScript object that handles the server response. |
3. | Make the Ajax call from the page by using an appropriate event handler. |
We first register our request handler by making a call to the registerRequest() method of ajaxEngine:
ajaxEngine.registerRequest('getData','getData.php');
We have now associated the name getdata with a request to the server routine geTData.php. That server-side routine is required to return a response in well-formed XML. The following is an example of a typical response:
<ajax-response>
<response type="element" id="showdata">
<div class="datadisplay">
The <b>cat</b> sat on the <b>mat</b>
</div>
</response>
</ajax-response>
Such responses always have a root element <ajax-response>. The <response> element it contains in this example has two attributes, type element and id showdata. These signify, respectively, that the response contains HTML, and that this HTML is to be used to update the page element having id showdata. This element is updated via its innerHTML property.
Tip
| Rico is capable of updating multiple page elements from one request. To achieve this, the <ajax-response> element may contain multiple <response> elements. |
The other form of response that Rico can return is a JavaScript object. Here's an example:
<ajax-response>
<response type="object" id="myHandler">
<sentence>The cat sat on the mat.</sentence>
</response>
</ajax-response>
Here the type has been set to object, indicating that the content is to be dealt with by a JavaScript object, the identity of which is contained in the id value (here myHandler). The content of the response is always passed to the ajaxUpdate method of this object.
How the response handler is registered depends on which type of response we are dealing with. For responses of type element, you can simply call:
ajaxEngine.registerAjaxElement('showdata');
In the case of responses containing a JavaScript object, you will need:
ajaxEngine.registerAjaxObject('myHandler', new myHandler());
Whereas responses of type element are simply intended for the updating of HTML page elements, responses of type object can have handlers to process responses in any way they want. This allows Rico applications to be built ranging from simple to sophisticated.
A Simple Example
We can see Rico in action by using the simple script of Listing 20.1. This application updates two HTML elements with a single call to Rico's ajaxEngine object. The script for the application is in Listing 20.1.
Listing 20.1. A Simple Rico Application
<!DOCTYPE HTML PUBLIC "-//W3C//DTD HTML 4.01 Transitional//EN" "http://www.w3.org/TR/html4 |
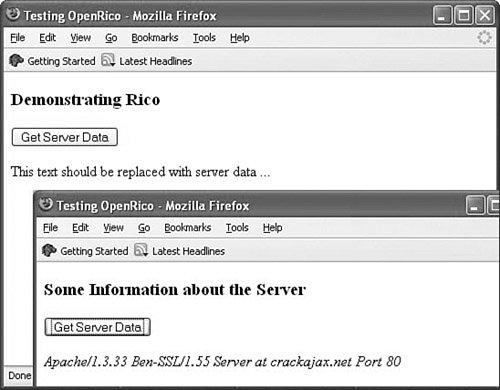
You will see from the code that the single function callRICO() is used to register both the single request handler myRequest and two response handlers. The response handlers are used to update two <div> containers; one of these contains the page's heading, the other a short text message. On making the Rico request, the contents of both are updated, leaving the page with a new title and now displaying some server information instead of the previous text message. Figure 20.1 shows before and after screenshots.
Figure 20.1. Updating multiple page elements with Rico.
The server routine is a simple PHP script that outputs the required XML data. The script uses PHP's $_SERVER['SERVER_SIGNATURE'] global variable. Note that the script constructs and returns two separate <response> elements, each responsible for updating a particular element in the HTML page.
Listing 20.2 shows the server script.
Listing 20.2. The Server Script for Generating <ajax-response>
<?php |
Tip
| Lesson 9, "Talking with the Server," discussed problems that can occur due to the browser cache. In that lesson we used a workaround involving adding a parameter of random value to the URL of the server resource that we wanted to call. This script example uses another technique, including the header commands header("Cache-Control:no-cache"); instructing the browser not to cache this page, but to collect a new copy from the server each time. |
Caution
 | PHP's $_SERVER global array variable was introduced in PHP 4.1.0. If you have an older version of PHP installed, you'll need the global variable $HTTP_SERVER_VARS instead. |

![[View full size image]](20fig01_alt.jpg)